IP QFSKS02 Race Series Front Spring Kit LTR450
RACE TECH HI-PERFORMANCE SPRING KIT
|
|
|
|
Disassembly D1 Clamp Shock into a vise with Soft Jaws. D2 Loosen Lock Ring. D3 Remove all spring preload using a Spanner Tool or by loosening the Collar by hand. D4 Clean and lube the threads. |
|
|
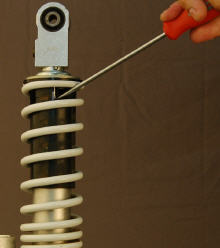
D5Use a small Screwdriver or similar tool. Find the opening in the plastic Dust Shield and gently pry the Bottom-out Bumper away from the end of the Shock approximately 50mm (2”).
|
|
|
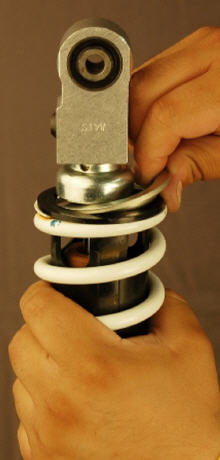
D6Compress the Spring slightly by hand and remove the Retaining Collar being careful not to pinch your fingers! D7Remove the stock Spring and Dust Shield. |
|
|
Assembly
NPL Collar
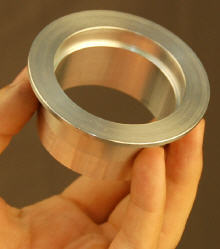
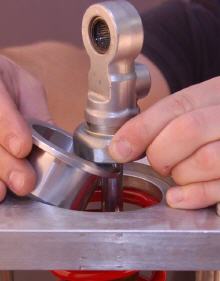
A1Install the NPL Collar (single flange) with the long end of the flange facing towards the bottom of the Shock.
A2Install the NPL Spring over the NPL Collar. The NPL Spring is the softest of the three springs.
|
|
|
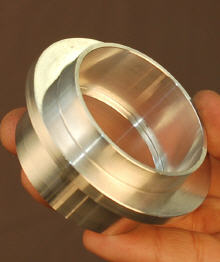
A3Install the Step-Cut Go-Between Collar. The Collar has a step on the inside diameter. The larger diameter must go towards the threaded portion of the shock body for proper clearance.
|
|
|
Tuning Options and
Middle Spring Assembly
A4 A stacked spring can provide a progressive spring rate. When the Go-Between flanges touch, the spring rate gets stiffer. It is possible to decrease this distance using Crossover Rings. Two sizes of crossover rings are provided, ⅛” and ¼”. This allows for a ½” adjustment range in ⅛” increments.
A5 Once you have received the specs for your application install the center spring and proper Crossover Rings (if recommended).
A6 No Crossover Ring– (Softest setting). The arrow shows the largest distance between the two flanges.
|
|
|
A7 ⅛” Crossover Ring - install just the ⅛” Crossover Ring. |
|
|
A8 ⅜” Crossover Ring - install both the ¼” and ⅛” Crossover Rings together. |
|
|
A9 ½” Crossover Ring - (Stiffest setting) remove both rings and flip the Standard Go-Between so that the long flange extends into the center spring.
Refer to the DVS Specs at www.racetech.com to get the recommended Crossover distance for your application (you don’t need an Access Code to get spring setup specs). |
|
|
Main Spring Assembly
A10 Race Tech Spring Kits for the LTR450 stock front shocks include a “deep drop” style Lower Spring Retaining Collar. This requires the spring set to be compressed approximately 1.5” (37mm) for installation.
A Hydraulic Spring Compressor should be used to safely install the Retaining Collar. Many suspension shops have this type of Spring Compressor. If you are unable to find someone in your area, contact Race Tech for details about purchasing a Hydraulic Spring Compressor. You can also send your shock into Race Tech and we will be happy to install your Spring Kit for you.
|
|
|
A11 After the Center Spring, install the Main Spring and Lower Spring Retaining Collar using a Hydraulic Spring Compressor.
|
|
|
Preload Setup P1 Refer to the DVS Specs from racetech.com. P2 Adjust the Preload Collar to set the preload.
Measure the overall length of the spring assembly with no tension. Subtract the Preload (from the DVS Spec) to calculate the installed length of the Spring assembly. Then use the Preload Adjusting Collar to adjust the spring set the amount specified in the DVS specs.
|
|
|
Tighten the Lock Ring
A12 Gently tighten the Lock Ring against the Preload Collar being careful not to change the Gap.
A13 Repeat procedure for the second shock.
|


